
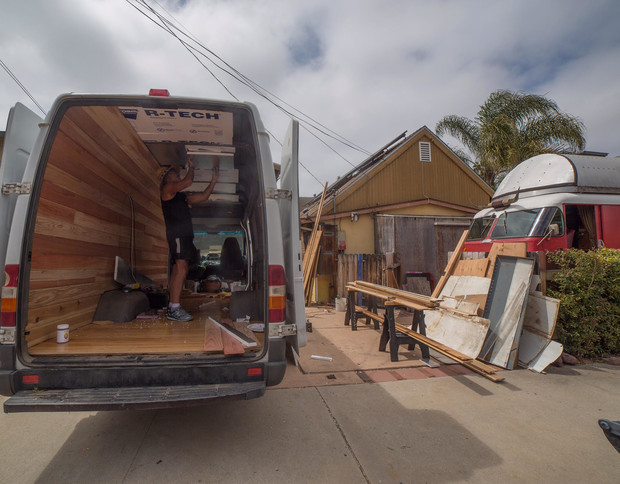
My Sprinter was a dream to drive, but the living quarters were a problem. Things were always sliding around and it was hard to keep anything organized. I started building a list of features I wanted to put into my van. As the list grew, I realized that I needed to remove everything and start from scratch. I knew coming up with good design was key. I needed a well thought-out space that served multiple functions and had built-in incentives for keeping my stuff orderly. I spent a lot of time prioritizing my needs and thinking about how to most simply address those needs.
Here’s my wish list of features (in no particular order:
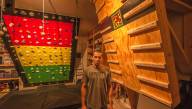
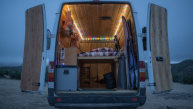
#1: Install a wood stove. You can’t beat the dry heat and pleasing aroma of a wood stove. Propane stoves are always a nightmare in my experience, with fumes and wet heat that sinks to the ground. I bought a house with some land in Washington state earlier this year, so I knew heating would become a concern; even in the deserts of Southern California this past winter, the 20º nights became unbearable at times, a result of poor insulation and no heat source.
#2: Insulate with EPS foam and wood. EPS insulation doesn’t break down with road vibrations, and wood walls make it easy to accessorize the walls with shelves and hooks to get stuff off the ground.
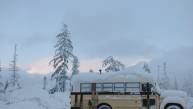
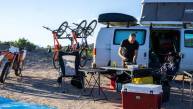
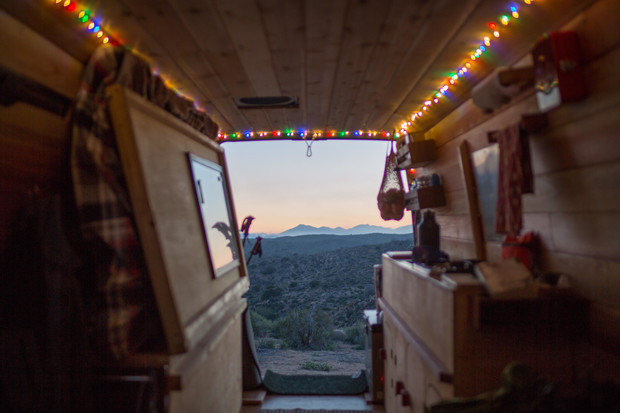 Enjoy the view from the road with Cyrus Sutton's awesome tips on van build outs. Cyrus Sutton photo.
#3: Make a functional kitchen. I never had a kitchen in my van, and I really wanted to have a nice space I could store, clean, prep and cook food. Over the years, I’d grown to cooking a lot as a way to save money, eat fresher and minimize my consumption of packaging waste.
#4: Install a solar system. Although the solar system I had in my Ford was nice for my electronics when the weather was fair, I wanted more power. As part of my kitchen, I wanted a refrigerator to store perishables and not have to deal with always getting ice and emptying a smelly warm cooler after it all melted. I also wanted to connect the 12V fan and vent that came with the van.
#5: Make a space I could walk through the whole way. It seemed like a shame that I couldn’t take advantage of all the height and floor space of my new van in the current design which had a huge and heavy wood rack separating the back from the main compartment.
#6: Make an organized, easy to access place for my short surfboards and long board.
#7: Make a work desk so I can have a clean space to work on my projects
Building Out The Solar and Battery System
The first step was hiring an electrician to help me install my solar system. It's made up by:
-A 12 Renology 100w 12v solar panels with voltage regulator ($330)
-2 100ah AGM marine batteries ($240)
-A Krieger 1500 watt inverter ($140)
-8 outlet energy saving power strip ($35)
-LED christmas and white copper wire fairy lights ($40 for both)
-A Whynter 45 quart electric top loading compressor fridge ($445)
The electrician and I measured and drilled the holes for the solar panels on my roof. We used self-tapping screws and lots of white caulk to seal the screws to prevent rust and roof leakage. The screws fit into the mounting brackets on the underside of the panels and held them securely in place. He ran the cable down into the inside of the van from a hole he drilled and carefully sealed from the roof. The batteries were wired in parallel, meaning positive to positive and negative to negative, which basically made them into one 200ah battery unit.
He ran the leads from the panels through the voltage regulator and then into the batteries. The voltage regulator protects the batteries from overcharging. We then connected the inventor, which converts the direct 12V current from the batteries into AC watts. I connected the inverter to the positive and negative leads of one battery and mounted both the charge regulator and the inverter.
Finally, I plugged the power strip into the inverter. The red and green light indicated my system was now charging and ready for use. With the solar system installed, I edited my film Island Earth for a couple weeks (watch the trailer above) and coordinated a good time to come down to San Diego and meet Glen to build out the inside.
Building Out The Van's Interior
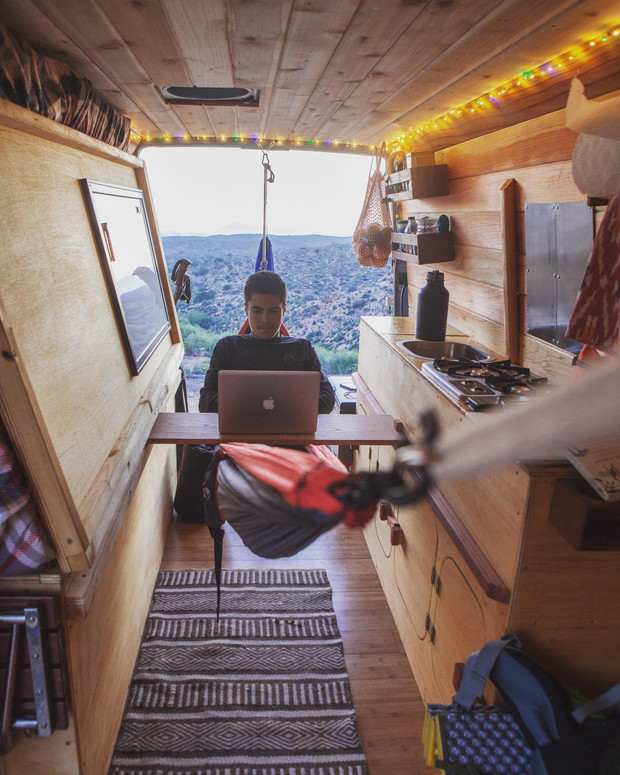
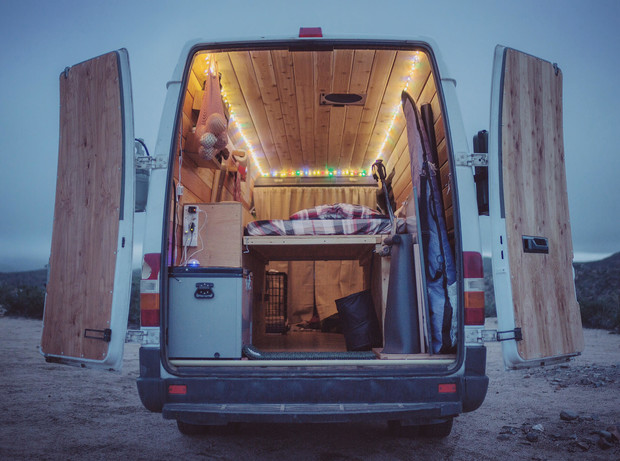
 Note the longboard sling, kitchen, curtains, workspace, and whiteboard on the back of the fold-down bed. Cyrus Sutton photo.
I met Glen at his place in San Diego at 7 AM just like I’d like we’d done three years before. I sketched out what I’d been thinking and showed it to Glen. We drove to the lumber yard for the first of many trips. I wanted an interior that smelled and looked great, so we chose a mix of cedar and redwood tongue and groove to line the walls with. For insulation, we chose 1" R-Tech brand EPS foam with a single-sided reflective barrier.
We also bought two large sheets of birch ply for the cabinets, two pieces of cheap composite plywood for the subfloor and an inch-thick piece of ply wood for the bed support. We also bought a bunch of 1 1/4" self tapping metal screws, two piano hinges, 6 door hinges, and a few 1” x 2” and 1” x 1” wood strips for supports. For the floor, I bought solid bamboo wood flooring commonly used in homes.
RELATED: Cyrus Sutton and the qi of the van life
We started by ripping out the existing interior. It must have been built with scraps from a large industrial building project; the pieces of wood they used were heavy and huge. They used 3 screws where they could have used one, and it took us most of the first day to remove it all. It was a good bet that when we finished our build out, it would be many hundreds of pounds lighter.
The last step was to rip out the imitation wood floor, which covered a cesspool of mold. Apparently it experienced a massive flood, probably during its former days as pet grooming mobile in Portland. Instead of cleaning it up, the builders simply laid new flooring over the top of the wet ground. The amount of mold I’d must have inhaled unknowingly over the past year made my skin crawl.
After cleaning out the mess, we cut out the composite plywood to match the floor space. We then drilled it down with self-tapping screws, Glen took out his table saw and began to masterfully cut the interlocking bamboo floor panels to fit the floor.
What Tools Do You Need?
 A table or angle saw is critical for making the short, precise cuts needed to make the most of a tight space. Cyrus Sutton photo.
Here’s a list of tools used to build out my van. I’ll spare you a detailed materials list because every build is different and listing the lumber and hardware we bought without a complete set of blueprints would do more harm than good. Just use common sense, make a plan and calculate what you need.
#1: Circular saw. For cutting clean, straight and long cuts.
#2: Jig saw. For cutting rounded edges.
#3: Table/angle saw. For making short, precise cuts that need to be a specific angle (often used to make cuts that will be joined together).
#4: Cordless drill. For drilling and screwing.
#5: Drill bit and screw bit set.
#6: Tape Measure and chalk line for marking cuts.
#7: Angle measure. To check angles and mark for cutting.
#8: Clamps for holding wood together for drilling.
#9: Vise grips.
#10: Pencils.
#11: Ear and eye protection.
#12: Right angle.
#13: Hammer.
After finishing the floor, we lined the walls with insulation as well as cedar and redwood tongue and groove. This was challenging and definitely a two-person job, because many of the pieces of wood were not completely straight. Glen created various wedges to keep each section in place while I pushed with all my strength prior to locking their grooves in with screws.
With the floor and walls skinned, we broke out the tape measure and had an in-depth conversation about the features I wanted and exactly how they would best fit together. Glen’s experience and spacial awareness no doubt saved the project from multiple mishaps at this stage. He quickly and skillfully assembled the wood cases outside of the van and placed them inside multiple times to check their fit.
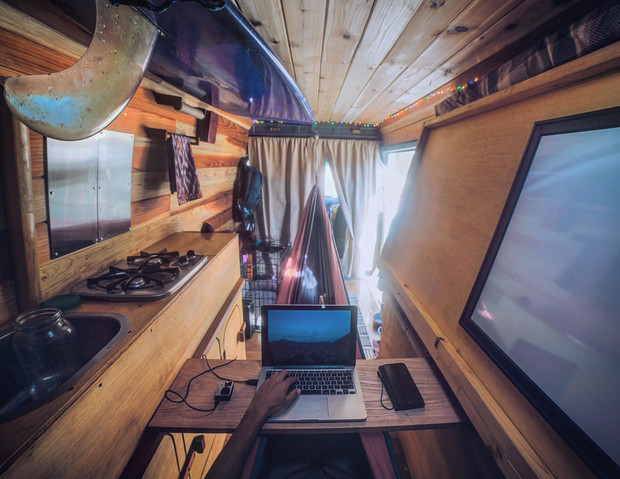
 Cyrus' hammock work station is "a game changer." Cyrus Sutton photo.
His construction was lightweight and strong. It centered around the framing up everything with 1" x 1" and 1" x 2" strips which he used to drill the plywood into to form right angles. And the strength and structure of the 1" x 2"’s allowed him to use thinner 3/8” inch thick pieces of plywood for the cabinets.
The bed used a 7 foot-long piano hinge and caught a sturdy and solidly supported 2” x 2” piece of redwood on the opposite side of the kitchen cabinet. The main storage compartment along the wall under the bed also used a 7 foot piano hinge. All of the hinges for the cabinet doors were small door hinges. Glen had a trick of drilling the hinges in before he cut out the doors. He then removed the hinges and cut the doors with a jig so the doors and hinges fit perfectly.
5 Things Carpenter Glen Does To Keep His Work Clean and Looking Good
 Glen measures twice, maybe even three times, before cutting. Cyrus Sutton photo.
#1: He always measures twice or three times before making a cut.
#2: He creates templates out of cheap and found materials like cardboard or thin/cheap wood to test and refine his measurements.
#3: He always pre-drills holes with bits slightly smaller than the screw size before screwing.
#4: He often counter sinks this holes as well to sink the screw heads and avoid splitting the wood.
#5: Whenever he’s making an important cut with his circular saw, jig saw or table saw, he’ll often cut the wood upside down to avoid frayed edges caused by the saw blade.
Finishing The Wood and Finalizing The Features
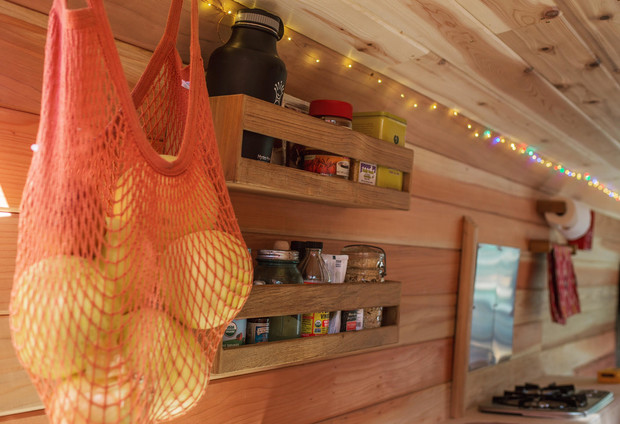
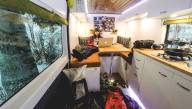
 Simple, clean, and with plenty of space for food, computers, and surf gear. Cyrus Sutton photo.
My idea for the inside was to make the space was as open and simple as possible while still being able to store all of my stuff. All of the supports were hollow and served as storage compartments. Top loading compartments were implemented wherever possible. I wanted to be able to transform the space from a bedroom to a living room/kitchen with the dropping of a bed that could easily latch to the wall when needed.
To finish the wood, I wanted to avoid harsh chemicals, so I didn’t have to breathe in their VOCs for weeks or months. I also didn’t want to mask the smell of the raw wood, so I looked up natural wood sealing options and found a recipe that used two parts olive oil, one part lemon juice, and a few drops of essential oils. I mixed them all before applying and the results were awesome. The only place I used conventional spar varnish was for my countertop, where I needed extra protection from wear.
To top off the basic design, I ordered a bunch of small things on Amazon. Here’s my shopping cart:
Compact teak nautical shelves ($150)
Fruit basket ($23)
Fold down teak wall seat ($120)
Linen hanging clothing and shoe organizer ($19)
Stainless steel cocktail sink basin ($100) that connects to a 5 gallon bucket
Chrome pump faucet ($25) that connects to a glass 5 gallon water bottle ($47)
Stainless steel propane stove ($120)
The Van's Final Feature List:
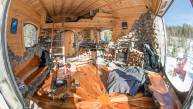
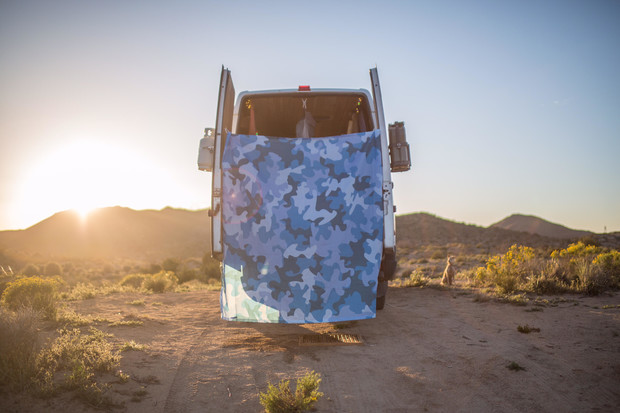 The van features a full private shower system with a raised bamboo grate and shower curtain. Cyrus Sutton photo.
#1: Vertical racks at the rear for shortboards, tripod, beach umbrella, fishing rods and yoga mat
#2: Raised bamboo grate, solar shower and shower curtain that spans the two back doors to create an outside but private shower area.
#3: Sink and pump faucet.
#4: Propane stove with propane container mounted on outside of van.
#5: Clothing storage and hanging rack.
#6.: Top loading compressor fridge. Energy efficient!
#7: Food storage.
#8: Glass water jugs with pumps. Padded and secured.
#9: Clothing and backpack hooks.
#10: Fold-up third seat.
#11: Ventiline vent with 12V high-powered fan.
#12: Fold up bed. Underside is a whiteboard and corkboard for storyboarding, planning and notetaking.
#13. Hammock mount and hammock desk. My most proud invention; a game changer when working out of the van!
#14: Longboard sling on inner roof.
#15: First aid kit.
#16: Kitchen towel and paper towel rack.
#17: 2 sets of 32’ LED Christmas fairy lights.
#18: Compact wood stove measuring 8” x 8” x 14” (yet to be installed).
#19: Rear exterior mounted propane cylinder and diesel gas can.
In total the build cost me around $8,000 for solar, lumber, hardware, accessories and my friend Glen’s time. This wasn’t the most complicated build out, but I used high quality materials, and wanted to get it done quickly. The entire conversion would have taken nine solid days start to finish with two people. I took a few breaks during the finishing of the wood and installing the remaining features so it’s taken two and a half weeks.
You could save a lot of money by doing it all yourself, using cheaper wood (only using plywood for the walls), and not having full-on solar system. I hope this was useful, but here are a few links to help give you ideas and more specific build information. Good luck and happy trails–see you on the road!
My instagram: @cyrus_sutton
Van Life Tumblr, with photos and links of many build outs: http://van-life.net
Great forum for Sprinter vans: http://sprinter-source.com
Cool software to help you draft out our ideas: http://www.sketchup.com
To contact Glen Horn for consultation, send him a message via Facebook at Roberta Glen Horn
Finally, see more at: http://www.reef.com/blog/van-life-cyrus-sutton-par...
From The Column: Base Camp
What Does Your Car Camping Vehicle Say About You?
Base Camp: Cody Cirillo and Kellyn Wilson’s…

Basecamp: Spring Skiing At The Lofoten Ski Lodge
The Pursuit Of Parking: Building, Living…

How Mikey Basich Keeps Reinventing Life on the Road

This Ain’t #VanLife: Austin Smith and His…

Base Camp: Sage Cattabriga-Alosa’s Insane Backyard…

Big, Bright and Blue: Meet Nancy, the Coolest…
Basecamp: Reinventing the Classic Austrian…
How Chris Grenier and Alex Andrews Built an Action…
How Zahan Billimoria Turned His Garage Into a…

How Tyler Bradt Travels the Globe Surfing and…

Tragedy, Rebuilding and Life on the Road: How…
How Wintertux Built a Backcountry Skiing Oasis in…
Rory Bushfield on How to Build Your Own…
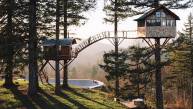
The Cinder Cone Might Be The Treehouse That Can’t…
How To: Hack your Van Into The Ultimate Camper Van
The Ultimate Mountain Bike Van Conversion for…
The Incredible Tiny Cottage of Snowboarder Mike…
Gruber
November 14th, 2016
Wow… too good !!!
___________________________
ufo3d.com
m9a406
June 8th, 2017
This tutorial seems amazing and I will definitely be doing this to my van soon. I just have to complete all of my https://au.edubirdie.com work first and then, I can worry about changing my van to look different.
Neville
July 5th, 2017
Thanks for this ultimate tutorial for me dissertation writing services. I will definitely be doing all these things told by you here. I think that if I do these things to my van, my van will become a badass van for sure.
Rahul ji
July 5th, 2017
Thanks sir sharing this post yah post bahut acchi hai isse ham jaise bahut sare ho help milti hai realy thanks sir.
aur apki is knowledge ko share karne ke liye thankss sir.
Isi tarah ap apna article share karte rahe sir mujhe bahut pasand hai.
mai apko bahut time se follow kar raha hu.
thanks sir realy thankss
independence day shayari
15 august shayari
Swatantrata diwas shayari in hindi
independence day status in hindi
happy independence day status
independence day quotes in hindi
independence day sms in hindi
status on independence day
happy independence day messages
15 august status in hindi
Rahul ji
July 5th, 2017
Thanks sir sharing this post yah post bahut acchi hai isse ham jaise bahut sare ho help milti hai realy thanks sir.
aur apki is knowledge ko share karne ke liye thankss sir.
Isi tarah ap apna article share karte rahe sir mujhe bahut pasand hai.
mai apko bahut time se follow kar raha hu.
thanks sir realy thankss
INDEPENDENCE DAY SHAYARI
HINDI SHAYARI
WHAT IS SEO
HINDI LYRICS
Richard190
July 8th, 2017
Expectations are high regarding the new features which are going to come in with the launch of FIFA 18.
And particularly after an exhilarating release of trailer a few days back, fans have gone really crazy.
A high-quality game is definitely on the cards. Want to know more about it? Check out this website Gamegoal
Enimeny22
August 15th, 2017
Wow.. it’s amazing. It’s a big luck be on this website. I surely will write about you. I use my assignment help for it.
Songs.pk
August 20th, 2017
I am more than happy to search out this website. I would like do thank for this nice read!! I positively enjoying each post of it and that I have bookmarked to envision out new stuff you post.
Songs Download
vishal23
August 25th, 2017
Thanks for your visit, Here is best site for you to play klondike solitaire free online games. This portal provides you best collection of games.
songspkin
November 1st, 2017
Very useful information i got i visit this blog very often and i am very interested to know articles whenever this website updated Mp3 Song Free Download
roll the ball
November 12th, 2017
Thank you for sharing this article with us! I believe there will be more people like me, they can find many interesting things in this article of you!
- impossible game - roll the ball
jazz2018
January 6th, 2018
Thanks for sharing. The lesson is much easier than any other and I feel it will be help me most my van activity. https://typemyessay.blogspot.com also kind of service provider.
hanan
February 27th, 2018
Nice post! This is a very nice blog that I will definitively come back to more times this year! Thanks for informative post.
You can visit our website He specializes in moving furniture
نقل عفش جدة - شركة نقل عفش بجدة - سعر نقل عفش جدة ومكة
hanan
February 27th, 2018
Nice post! This is a very nice blog that I will definitively come back to more times this year! Thanks for informative post.
You can visit our website He specializes in moving furniture
نقل عفش جدة - شركة نقل عفش بجدة - سعر نقل عفش جدة ومكة - افضل شركات نقل العفش بجدة - اسعار شركات نقل العفش بجدة - دليل شركات نقل العفش بجدة - ارخص شركات نقل العفش بجدة - نقل عفش جدة - افضل شركات نقل العفش بجدة - اسعار شركات نقل العفش بجدة - دليل شركات نقل العفش بجدة - ارخص شركات نقل العفش بجدة - نقل عفش جدة - افضل شركات نقل العفش بجدة - اسعار شركات نقل العفش بجدة - دليل شركات نقل العفش بجدة - ارخص شركات نقل العفش بجدة
hanan
February 27th, 2018
Was very good post
Thank you
You can visit our website He specializes inmoving furniture
نقل عفش - نقل عفش جدة - نقل عفش - نقل عفش - شركة نقل عفش بجدة - شركة نقل عفش - شركة نقل عفش - نقل عفش القصيم - بريدة - نقل عفش ينبع - نقل عفش الخرج - نقل عفش ضبا - نقل عفش حفر الباطن - نقل عفش نجران - نقل عفش الطائف - نقل عفش مكة - نقل عفش الدمام - نقل عفش تبوك - نقل عفش الرياض - نقل عفش جازان - نقل عفش سكاكا - نقل عفش الظهران - نقل عفش جدة ومكة - نقل عفش حائل - نقل عفش - نقل عفش المدينة المنورة - نقل عفش الاحساء - نقل عفش القطيف - نقل عفش خميس مشيط - شركة نقل عفش بجدة - نقل عفش - نقل عفش الرياض - نقل عفش والخدمات المنزلية - نقل عفش جدة وتخزين اثاث - نقل عفش وتخزين اثاث - نقل عفش جدة - نقل عفش - نقل عفش - نقل عفش
hanan
February 27th, 2018
https://ebad-rahman.blogspot.com/2017/02/transfer-jeddah.html
https://ebad-rahman.blogspot.com/2018/01/Transfer-of-Jeddah.html
https://ebad-rahman.blogspot.com/2018/01/jeddah-to-jordan.html
https://ebad-rahman.blogspot.com/2017/02/0553885449-0569159936-jeddah.html
https://ebad-rahman.blogspot.com/2017/02/moving-furniture.html
https://ebad-rahman.blogspot.com/2017/03/youtube.html
https://ebad-rahman.blogspot.com/2017/03/nakl-afsh.html
https://ebad-rahman.blogspot.com/2017/03/nakl-afsh-JEDDAH.html
https://ebad-rahman.blogspot.com/2017/03/0535220955.html
https://ebad-rahman.blogspot.com/2017/03/nakl-afsh.html
https://feeds.feedburner.com/blogspot/xDBgHO
https://www.instagram.com/ebad__rahman1
https://ar-ar.facebook.com/ebadrahmannn
https://twitter.com/basmakaled22
https://www.pinterest.com/fxcenturymaddi
http://ebad-rahman.blogspot.com//feeds/posts/default
http://ebad-rahman.blogspot.com/atom.xml
https://www.youtube.com/watch?v=utuqFWgr_yk
https://www.youtube.com/watch?v=ie08A9cI44A
https://www.youtube.com/watch?v=sE8wej3j1yo
https://www.youtube.com/watch?v=_9kiCpwQI0Q
https://vimeo.com/204725868
wingsio
March 14th, 2018
Thanks for the information your article brings. I see the novelty of your writing. bloxorz
Pole Smith
March 27th, 2018
Thanks for the information you brought to us.
https://www.promoocodes.com/coupons/target/ They are very interesting and new. Look forward to reading more useful and new articles from you!
Pole Smith
March 27th, 2018
Thanks for the information you brought to us.
Active Target Discount Coupons They are very interesting and new. Look forward to reading more useful and new articles from you!
unique submission
August 28th, 2020
When it comes to your academic dreams and grades we try to give our best by supporting you in completing your college assignments.
Our administrative experts work dedicatedly and passionately to provide top quality essay writing help to the students.
Meticulous paper structures, subject matter relevance, free from grammatical errors are main characteristics that our highly experienced and talented writers endeavor for.
Still drowning in the worry to complete your college assignments?
Get The Best Assignment Help From Best Assignment Helpers Online