 Check out our guide to bleeding mountain bike brakes below. Max Ritter photo.
Oh, the age-old question: why do my brakes not work? Hydraulic mountain bike disk brakes are probably the single most complicated and most used component on your bike, so it’s no wonder they need a ton of maintenance to operate properly. That maintenance, however, is not that difficult to stay on top of, but does require some patience and attention to detail. It’s not simply “bleeding” the line that will make your brakes feel good – there’s more to it. In this episode of In the Garage, I’ll walk you through what it takes to get your stoppers feeling as good as they can.
RELATED: Watch Accomplice on TGRtv Now
Before we dive into what needs to be fixed, here’s a quick rundown of brake anatomy. A hydraulic disk brake works quite simply: when you pull your brake lever, it moves a piston inside the lever assembly that pushes fluid through a hose down to your caliper, which then pushes pistons that move your brake pads to create friction and stop your rotor. Depending on what particular model brake you own, you either have two or four pistons per caliper, and the fluid is either mineral oil or DOT fluid.
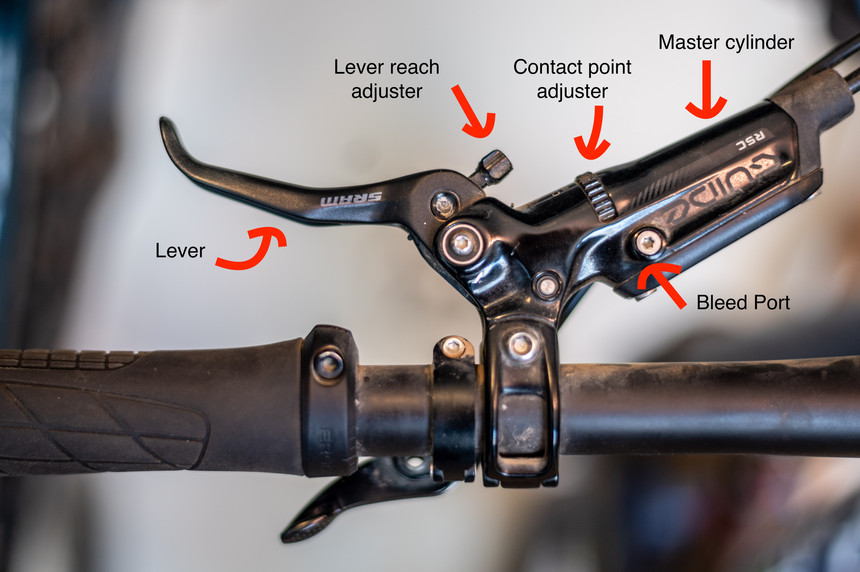 What are all those little adjuster on your brake lever? Max Ritter photo.
Diagnosing the problem:
What’s actually going on with your brakes? Are the levers pulling to the bars? Do they squeal when you try to slow down without actually stopping you? Does the bite point when you pull the levers feel inconsistent? These are all common things to happen, and unfortunately all have different causes.
When diagnosing a brake problem, the first thing I like to check is how dirty or contaminated your calipers, pads, and rotors are. Dirt mixed with the heat from braking is a bad combination. Look at your brake calipers, and I’ll bet they’re caked with grime and dust. Clean that off with some simple green or rubbing alcohol and good blast from a hose.
Secondly, check for brake pad and rotor wear. Pads and rotors use friction to stop you, so naturally they will wear down over time. Less pad material requires that the pad needs to move further every time you hit the brakes, meaning you have to pull the lever further to get the same effect. Pads, especially non-metallic pads, wear much faster than rotors, and it’s not uncommon to go through 3-4 sets in a season. Stock up early season when bike parts are on sale, and you’ll be good to go. A rotor should last you at least a full season or two, unless you’re riding non-stop downhill laps all year long.
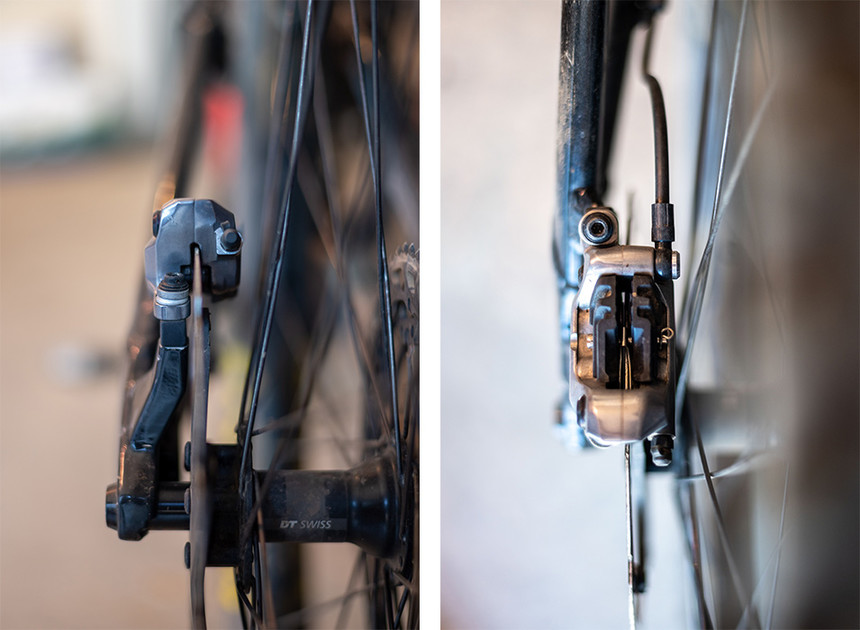 Check that everything is aligned and not rubbing. Max Ritter photo.
Third, check that your pistons can move freely and evenly. Get a good look at your brake caliper while slowly cycling the lever and watch that all the pistons are moving freely and evenly. If one or more is stuck, that will cause your brakes to feel like garbage. Take note of this, it’s easily fixable in the next step.
Finally, check that everything is actually lined up straight and that your rotors and pads aren't rubbing when the wheel spins freely. If something's not aligned, loosen the caliper bolts and move the caliper with your hand to align it. It will take a few tries to get right, and you might need to use a wrench or rotor tool to bend a rotor back straight.
Resetting Pistons:
If you have a stuck piston, no fear! It’s a relatively easy fix that just takes a little time. Grab a sturdy plastic tire lever, 7mm box end wrench, or a pad reset tool, and follow the instructions in the video below.
Bleeding Brakes:
Bleeding mountain bike brakes is a relatively simple process if you use the proper tools and manufacturer’s directions. Every brand uses a slightly different procedure, but the idea is the same: over time, air bubbles get trapped in hydraulic fluid, and by bleeding the brakes purges all those bubbles out. Fluid also gets dirty and breaks down over time, so sometimes you’ll need to drain the whole system and put in fresh fluid. Make sure you are using the right fluid for your system: DOT fluid for SRAM, Avid, Hayes, Hope and some others, while Mineral Oil goes into Shimano, TRP, and Magura brakes.
From some years of experience using various brands' brakes, here's a couple of things I've learned about the nuances of bleeding and setting things up:
1. It's really important to make sure the bleed port on your lever is the highest possible point, while the port on your caliper is the lowest point in the system when bleeding, otherwise bubbles will get trapped in the line.
2. It helps to put a bleed cup or syringe into the lever, pull the lever, and strap it to your handlebars, letting it sit for 30-40 minutes. This will allow bubbles to float up into the cup and dramatically firm up the lever feel when you ride.
3. When installing new pads in a system after a bleed, wet the new surface of the new pads with water and rub them together to get the first layer off so they have a nice strong bite.
4. Not all fluid is the same - be particular about what mineral oil or DOT fluid you put into your brake system, and NEVER mix the two. Here’s an interesting deep dive into brake fluid technology, explaining more detail.
Below are step-by-step videos of how to bleed all major brands’ mountain bike brake systems.
SRAM/AVID
Shimano
TRP
Hope
Magura
Hayes
From The Column: In the Garage
In the Garage: 2 Ways To Set Up Tubeless
In the Garage: How To Bleed Your MTB Brakes
In the Garage: Buying Used Bikes
In the Garage: How to Clean Your MTB
In The Garage: Inspecting A Bike After A Crash
In the Garage: What’s In Your Pack?
In the Garage: How to Adjust MTB Shifting
In the Garage: What’s the Deal With Tire…
In the Garage Ep. 2 – What’s In the Tool Box?
In the Garage Ep. 1 – Early Season MTB Checkup
About The Author
stash member Max Ritter
I manage digital content here at TGR, run our gear testing program, and am stoked to be living the dream in the Tetons.
MariyaDorothy
September 7th, 2020
Wow!! The videos shared here are interesting. I love riding bicycles. I think its a kind of add here. They are very skilled in riding bicycles. That’s why they are doing such kind of things. Best CBD Oils I am also interested in doing it.