Gear & Tech

Freeride + Mountaineering = FreeMo
TGR Tested: WTF is #FreeMo?
Story by Max RitterDamn, our industry really just loves putting stupid names on things we like to do in the mountains. Call it whatever you may, but it’s really just skiing, and we can totally get behind this foot-powered trend of getting rad in big mountains. With dubious roots in the French Alps that soon found their way across the pond thanks to some enterprising North American freeride skiers, #freemo is the next big trend. I'll admit I'm all for a good sufferfest in the mountains, so digging deep seemed right up my alley. What probably started with some baguette-wielding Frenchies in the tram line at the Aiguille du Midi is now unequivocally spreading to the steeps of North America, so of course I set out to figure out what the damn thing is all about. Unfortunately, with the spread of COVID-19, our testing season for true ski mountaineering lines got cut short here in the Tetons, so we'll have to wait until next year to further put these through the wringer.
At its core, I learned that it’s all about going light and fast to efficiently move through the mountains to access the best skiing you can find. Sounds cool. It combines the disciplines of skimo racing (lycra and skinny skis), modern mountaineering (ropes and all) with some good old-fashioned shredding (steep and deep). Sounds even cooler. Here, in #freemo land, I found lots of folks all in for a good adventure on the way up - but I quickly found out that it’s still about skiing, so no comprises were made for the way down.
Luckily, with the advent of new technology and materials, and the boom of backcountry skiing in general, we’ve seen a crop of new gear come up that proves to be just the right balance of uphill-oriented and freeride-ready. This stuff won’t weigh you down on those 10,000-foot days you'll come to crave, and will also be fun to ride in all conditions. At the same time, much of this stuff could be used in a skimo race like the Elk Mountain Grand Traverse, and that just proves how versatile gear has become. In choosing my #freemo kit, I took some majorly minimalist steps, and want to help you find ways to effectively shave weight from your kit and boost the fun level all at once.
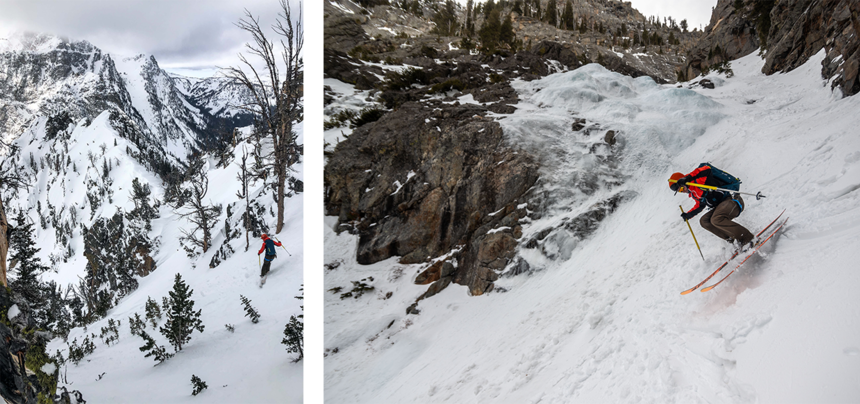
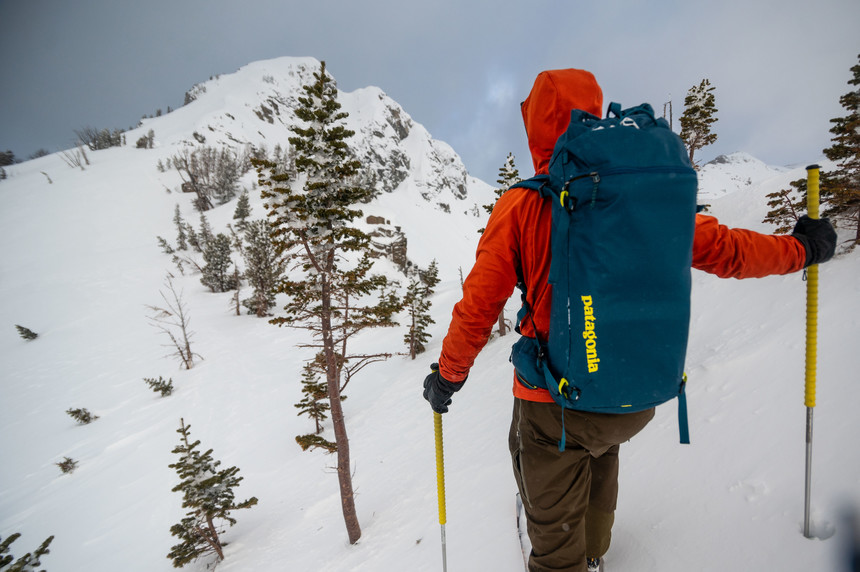
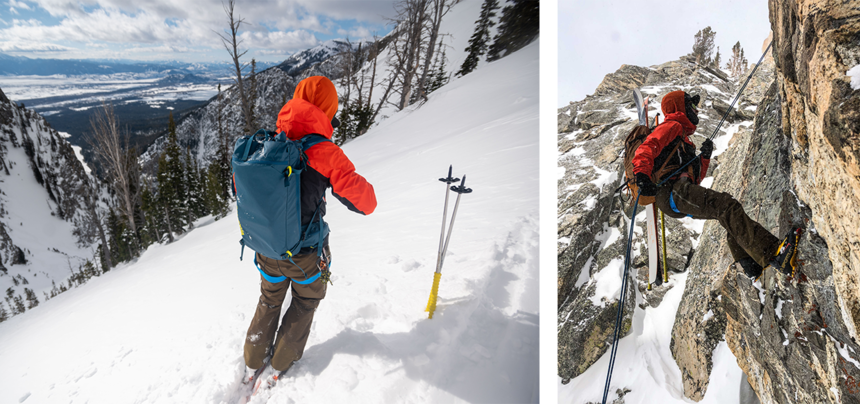
It's a freeing experience to go fast and light in the mountains, and the right gear certainly makes it easier. Lily Krass photos.
Before diving into the exact gear I chose for a season of exploring the Tetons, here are some points on how I narrowed it all down:
When it comes to skis and boots, I found that pairing a skinny ski with an ultralight binding and a stiff lightweight touring boot is the way to go. It went against everything I believed it to ski a sub-100mm ski in the backcountry, but it’s pretty damn fun to learn something new and have it open new doors. Find a ski that you trust on scary terrain and pop the lightest binding you can find on it – it’ll go a long way. Secondly, there’s no need to go into skimo-racing boot territory here, but please ditch your resort boots with a walk mode here – there are plenty of boots that weigh next to nothing that are still stiff enough for hard skiing. The one caveat to using this gear is knowing it does have its limits, mostly in the durability department, as I learned after breaking the tongue clean off my boots after only half a season of use.
On the apparel front, a full hardshell kit is still king. When you are in technical terrain, getting blasted by spindrift and precip is a fact of life, so I always choose more weather protection over less here. That being said, these materials have come a long way, and gone are the days of stiff and heavy outerwear. We’re talking stretchy Gore-Tex, baby.
Finally, finding a proper backpack to carry all my tools was harder said than done. It needs to be as light as possible, but still have enough bells and whistles to carry skis, a rope, an ice axe, avalanche gear, as well as extra layers, food, and water.
Of course, it’s not just the gear that makes #freemo. It’s about a dedication to traveling in good style in the mountains – that means knowing your limits and how to stay safe within them. Any form of ski mountaineering is an incredibly dangerous sport, so doing your homework and knowing how to use all your safety and climbing gear properly is paramount to your success. Remember, coming home at the end of the day is always the priority. Make sure you are up to speed on snow safety and technical rescue training, take your classes, and never hesitate to hire a qualified guide before venturing into unfamiliar terrain.
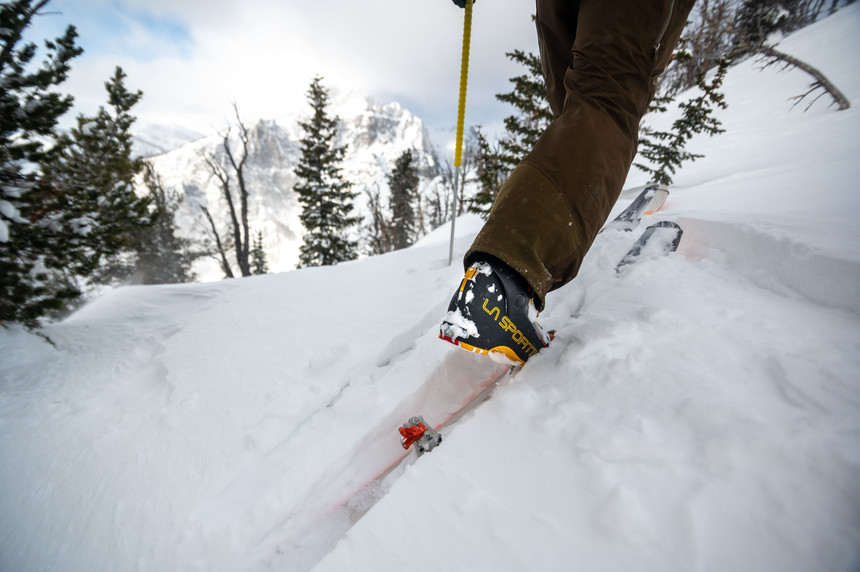
La Sportiva's Skorpius CR is the perfect combination of lightweight, walk-friendly, and powerful, making for the ultimate everyday mountain boot for long days in the hills. Lily Krass photo.
Boot: La Sportiva Skorpius CR
The Italian masterminds over at La Sportiva know a thing or two about making footwear for mountain travel. With firm roots in mountaineering and skimo racing, the brand has stepped out into the freeride touring world over the past few years. Their latest offering, the Skorpius CR, is a true hybrid between a skimo racing boot and a freeride beast, featuring a massive 68-degree range of motion and a simple mechanism to transition between walk and ski modes. At around 1100 grams for a size 27.5, the boot is pretty damn light, but crank those buckles and you’ll quickly realize how much power it delivers to your skis. I was truly amazed what this boot got me both up and down this season.
In the grand scheme of light boots, it actually falls on the heavier end of the spectrum, and that’s perfectly ok because it skis so damn well. To achieve the fit and performance I prefer, I messed around with the included forward lean spoiler (the stock setting is very upright), and added a Booster Strap, which didn’t add any weight and made the Skorpius’s flex stiffer and more progressive. With a generously wide forefoot and moderately high instep, this boot should fit most feet comfortably, and the toe bail will easily accommodate most crampons. The boot works with all tech bindings, including the ultra-niche La Sportiva TR2. I was incredibly impressed by these boots, save for the fact that my right boot's tongue broke in half after only half a season of skiing them. After talking to La Sportiva about it, they indicated it was a known issue with a wear point on the tongue and they were working on solution.
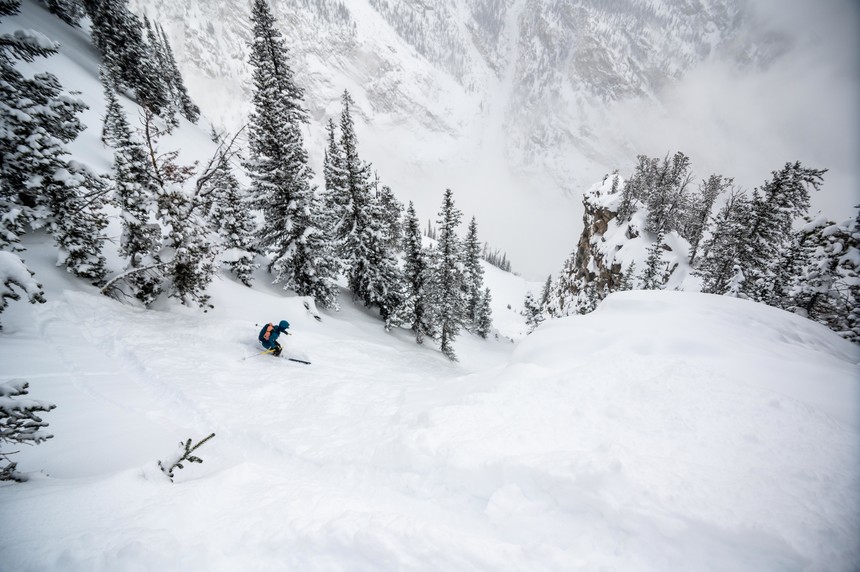
Yep, thats me skiing an 85-underfoot ski on a pow day in the Tetons. Atomic's Backland 85UL might be the best ski mountaineering ski on the market. Lily Krass photo.
Ski: Atomic Backland 85UL
Atomic has been killing the game when it comes to creating skis that punch WAY above their weight class. With the introduction of the Backland series a few years ago, skiers all over the world suddenly realized how heavy their existing gear was. Taking cues from the tried-and-true Backland 107 and Backland 95, and combining it with construction from their überlight rando racing skis, the all-new Backland 85UL perfectly fits that slot for a heavy-duty ski mountaineering ski. This might be the ultimate mating of skinny ski meets freeride machine, using ultralight carbon construction from the lighter Backland UL 65 and shaping it for long missions to couloir-smashing and steep skiing goodness.
A good dose of tip and tail rocker (read: minimal, but effective) with traditional camber underfoot give you plenty of edge grip on steeps and make the ski more maneuverable than anything I’ve ever skied in tight terrain. It even comes with HRZN tech in the tip that translated to a smooth ride in chopped up snow and extra float in chalky pow. The tip comes with skimo-style skin notches, and I’ve got my transition times down to Kilian Jornet territory now. No really, this might be the best 85-underfoot backcountry ski out there. I actually trust it in all kinds of snow, it’s light enough to never weigh me down, and it’s damn fun to ski.
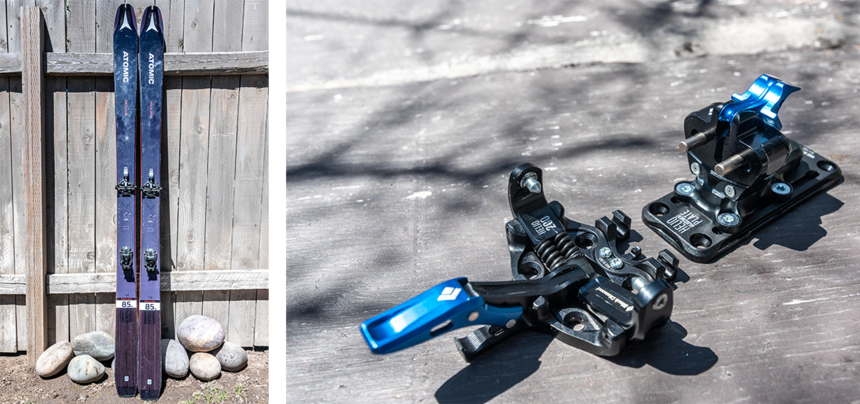
Finding a lightweight binding I fully trust was a tall order, but Black Diamond's Helio 200 certainly did the trick.
Binding: Black Diamond Helio 200 Binding
Buy the bindings here
Buy the crampons here
Pairing an ultralight touring binding with a ski that can actually rip in all kinds of snow conditions isn’t exactly a new thing to do, but Black Diamond’s Helio 200 is one of the first bindings in that weight class that I can fully trust to perform. There's very few moving parts, it's all metal, and it sits very flat on the ski. I’ll let you in on a little secret: it’s actually BD’s version of the ATK Haute Route 10, an all-metal pin tech binding trusted by some of the best ski mountaineers in the world. It weighs in at 210 grams per foot (including the optional leashes and adjustment plate), has a flat mode and two heel riser options, will take Dynafit-style ski crampons, and cranks to a release value of 10. It’s a simple binding that simply works.

Those funky yellow sticks with the long grips made it all the way over here from Chamonix. Turns out you can buy them here now too. Lily Krass photo.
Poles: Les Batons d'Alain
I’ll admit that these might be a little hard to find in North America, but that alone might just make the trip to Chamonix worth it. Created and tested in the icy heights of the Mont Blanc Massif by evil genius Alain Desez, these funky looking poles are a simply elegant solution to creating the ultimate ski mountaineering pole. With a ribbed grip that extends down most of the aluminum pole, you’ll quickly realize that having limitless hand position options will make steep skiing much easier. Plus, all the fun colors (including lots of euro flag patterns) will surely make you stand out on the skin track as you breeze past all the slowpokes.

Mountain Hardwear's Exposure 2 Kit is a classic hardshell kit for the worst weather the mountain can throw at you. It's comfortable, breathable, and looks pretty good to boot. Lily Krass photo.
Outerwear: Mountain Hardwear Exposure 2 Kit
Half the fun of ski mountaineering is being way out there in the elements, toughing out snow, wind, and even baking sun to get to the goods. Finding outerwear that holds up to the full gamut of weather the mountain will throw at you was tough: It needed to be durable for scraping over rocks, breathable for high-output skintrack days, waterproof for the when the heavens decide to open, offer enough mobility for technical climbing, and to top it off, I didn’t want to look like a dork out there. Mountain Hardwear’s Exposure 2 jacket and pants check all those boxes, and oven offers great packability, which I found especially useful on warm days where my shell jacket stayed in my pack most of the day. The Exposure 2 kit takes designs inspired from MHW’s long heritage outfitting the best mountaineers in the world, and puts it in a ski-friendly package, with a stretchy and slightly more relaxed fit as well as clever features like high pockets (great for when you’re wearing a harness), lots of vents, and a hood big enough to cover a helmet. It runs small, so consider sizing up.
Patagonia's re-designed Descensionist 32L pack carries everything I need for the biggest days and promises durability, comfort, and sleek looks. Lily Krass photo.
Backpack: Patagonia Descensionist 32L
Finding the perfect pack for ski mountaineering is actually pretty hard. It needs to do a lot of things, and only clever design can combine them all into a usable package. Patagonia’s re-designed Descensionist 32 not only checks all the boxes, but it’s comfortable, sleek, and light enough for big days. Over the past few years, the original Descensionist pack was a go-to for ski mountaineering missions, but the new 32 liter-version is an evolution of an already awesome design. It comes with four very important features – a separate avalanche tool pocket, an external helmet carry, a side zipper for easy access into the main compartment, and a frame/strap system that is comfortable while carrying heavy loads. It’s got room for everything I need to carry, including an ice axe, a 60-meter rope, food, water, layers, and either an A-frame or vertical ski carry on the outside. That even still leaves room for a DLSR camera inside if I decide to bring it.
Eyewear: Julbo Rush and Atomic Count 360HD
The mountains are a harsh environment, meaning aggressive winds, bright sunlight, and if all goes well, plenty of snow hitting your face on the descent. Proper eyewear is crucial not just for your performance, but also for looking as sick as possible. All jokes aside, finding sunglasses and goggles to stand up to the #freemo life wasn’t easy, but Julbo’s all-new Rush sunglasses and Atomic’s Count 360HD goggles are some of the best out there. On sunny days with lots of transitions, the Rush and its over-sized frame performs double duty as sunnies and goggles, meaning less time during transitions, and no fogging on the way up. On storm days, I pop on the Atomic Count 360HD, a stylish super-light and extremely comfortable ski goggle with one of the biggest fields of view on the market.
Avalanche Gear: Mammut Barryvox S Beacon, Carbon Probe and Arva Carbon Ultra Shovel
Buy Mammut avalanche gear here
Buy the Arva shovel here
Safety should always be the number one priority when traveling in the mountains, but in case things do go south, carrying the best avalanche rescue gear is imperative. Mammut’s Barryvox S beacon packs a very powerful punch into a tiny and light package. While it comes with a harness, I’ve found it most comfortable to carry in the dedicated pocket of my bibs, allowing for quicker access in an emergency – or just during beacon check before heading out. For an in-depth look at the Barryvox’s capabilities, read here. Mammut’s Carbon 280cm probe is the perfect combination of svelte and durable and is long enough to use in a real burial situation. While #freemo is all about fast and light, an avalanche shovel might be the one exception to this rule – Arva’s Carbon Ultra shovel might weigh in at 300 grams with its carbon shaft, but metal blade proves to be a heavy-duty snow mover I trust in any emergency.
When it comes time for breaking out the fun toys, I learned it was time to lose some serious weight. Check out the best ultralight mountaineering gear that's perfect for the freemo life. Lily Krass photos.
Mountaineering Gear: BD Couloir Harness, Petzl Gully Axe, RAD Line, and Leopard Crampons
Buy the Black Diamond Couloir Harness here
Buy Petzl gear here
Pointy things and ropes are to #freemo as beer is après ski. For most ski mountaineering applications, I’m only using ropes to get down terrain too technical to ski, so a length of skinny static rope like the Petzl Rad Line is exactly what is needed for rappelling and crevasse rescue situations. This 6mm hyperstatic super cord comes in at 22g/m – meaning you will literally forget there’s a 60-meter rope in your pack. It should be said that the RAD line is not suitable for lead climbing, but is perfect for getting on a belay for cutting a cornice or rappelling a choke in your line. Pair the rope with an ultralight harness like Black Diamond's Couloir harness and you are ready for action. The Couloir sports a unique easy-entry design that allows you to take it on or off without removing your skis – a huge bonus when in steep terrain.
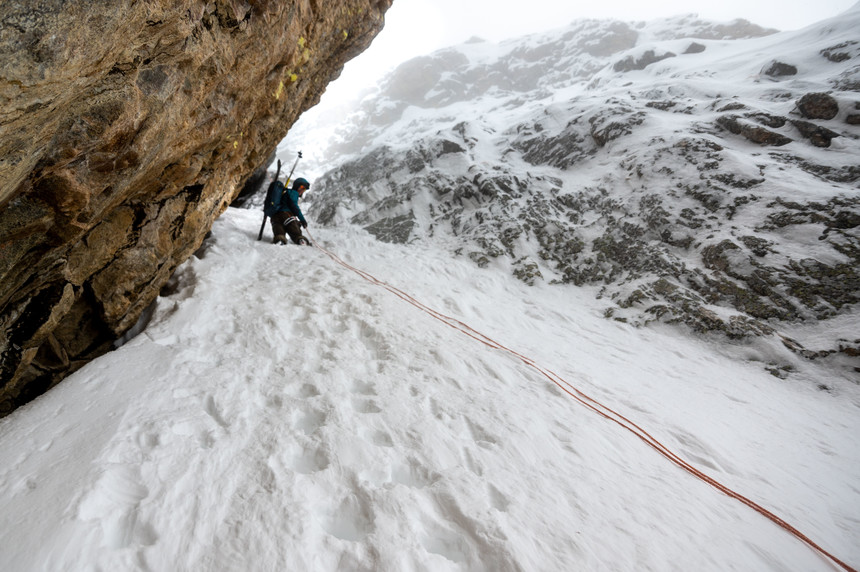
Petzl's RAD line is a true game changer when it comes to using a rope for skiing. It's so light you don't think twice about bringing it, and it will open up some new worlds for you. Lily Krass photo.
When it comes to pointy things, there’s no need for the heavy ice axes and crampons of yesteryear. Petzl’s Leopard Crampons are some of the lightest and most packable crampons ever made, thanks to a short length of cord replacing the stiff metal center bar. This allows the crampons to fold up to the size of your beacon. For an ice axe, I’ve found Petzl’s Gully to be the most effective for steep skiing. At 280 grams, it’s crazy light, but still has the capability of a heavier ice tool thanks to an adjustable pinky rest and a bent shaft. This means I can bring two and use them for easy ice climbing on routes that require it. It comes with either a hammer or adze.
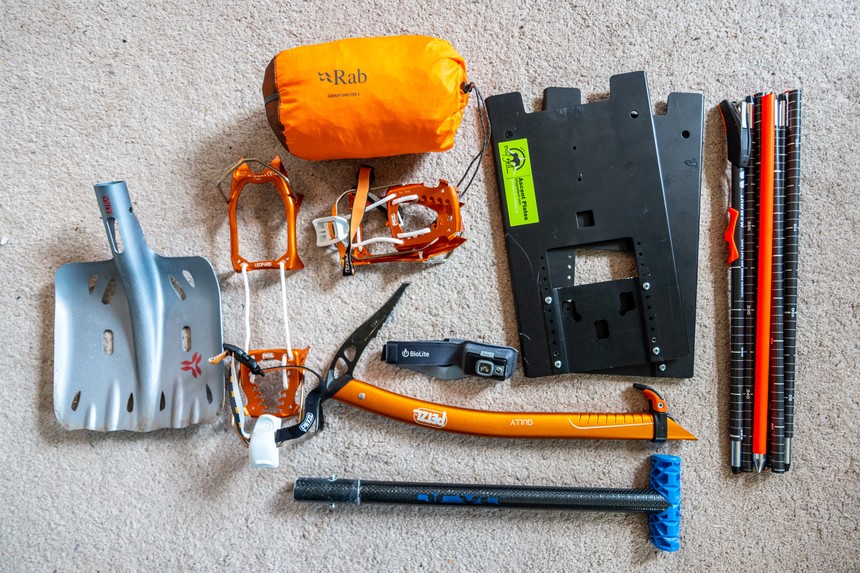
This all fits easily in the pack. I always carry the Rab Emergency Shelter, Biolite's ultralight and ultra-bright headlamp, and of course a beacon, shovel and probe. For deep days requiring a bootpack, nothing beats Billy Goat Tech's Ascent Plates and Petzl's ultralight Leopard crampons.
Extras: Billy Goat Tech Ascent Plates
Buy Billy Goat Tech's plates here
One the most obscurely awesome pieces of equipment I learned about in the ski mountaineering world elegantly solves a very real problem. Booting up steep snow sucks, especially when it’s deep. Billy Goat Technologies, a small outfit out of Pemberton, BC creates “ascent plates” to solve that issue. Think of them as snowshoes for getting rad. The aluminum plates attach to your ski boots using your existing boot crampons, like the Petzl Leopards. That means you can still front point if necessary while getting the full anti-posthole support of a snowshoe. These things made booting up couloirs in powder a breeze, and ultimately allowed me to completely re-think the possibility of skiing certain lines in the Tetons in winter.
Lighting: Biolite Headlamp 200
Depending on how you look at it, getting up early to go ski big lines is either really awesome (you get to experience sunrise in the mountains) or awful (you’re tired and it sucks to wake up at 3 a.m.). One thing that makes moving in the dark much better is a headlamp you can trust, like Biolite’s Headlamp 200. This super-simple and ultralight rechargeable headlamp puts out a respectable 200 lumens of light, and packs up small enough to fit in your pants pocket without noticing it. I’m also big fan of the other Biolite headlamps, including the brighter 330 version, because of their sleek low-profile shape, which means I barely feel them on my head.
Emergency Gear: RAB Ultralight Shelter
As one of those items that you really hope to never use, RAB’s Group Shelter 2 is a welcome piece of insurance in case you get stuck out in the cold. Full disclosure, this became part of my daily gear system after putting together a kit for the Elk Mountain Grand Traverse (where an overnight shelter is mandatory equipment and this is one of the lightest to check the box). However, once I started carrying it, I actually began to find reasons to use it not in an emergency, like hanging out on top of a line waiting for the snow to soften up. It’s basically a hybrid between a bivy sack and a tent fly, and it’s a great way to get out of the wind or cold to spend some quality time getting to know your partner face-to-face. Body heat will make the interior quite warm in a manner of minutes, which gives me hope in the case that I have to actually use it if shit hits the fan. Aside from this shelter, I always carry a first aid kit and a repair kit that includes the basics for survival.